The Complete React Handbook: The Good Parts of React
Everything You Need to Know to Build Great Apps

Developer, Mentor, Writer. Blog: https://www.devtoolsacademy.com/
Welcome to the React Handbook! You've come to the right place if you're looking for a simple yet effective approach to learning React.
This handbook follows the 70/30 rule, which means that you can learn the fundamentals of React by devoting 70% of your time to just 30% of the key topics.
I designed this resource for beginner and intermediate developers. In it, I'll go over all of the fundamental concepts you need to know to get started with React.
Are you ready to create your first React app? Let's get started.
What is React?
React is a JavaScript library that helps you build user interfaces for Web Apps.
It is open-source and maintained by Facebook. When you're working with React, the goal is to make a fast and scalable web app by dividing the UI into small components.
React uses a declarative approach – but what does this mean? You may have heard of imperative vs declarative approaches to coding, but let me simplify it for you.
In imperative programming, you tell the machine what to do, and it will produce the result.
Here's an example:
let num = [1,2,3,4];
let tripled  = [];

for(let i = 0; i < num.length; i++){
    let newNum = num[I] * 3;
    tripled.push(newNum)
}

console.log(tripled)   // [ 3, 6, 9, 12 ]
In the above code, we are providing line-by-line instructions to perform some tasks. If we do not give the proper commands the machine may fail to produce the desired result. It will only perform the tasks that we are explicitly telling it to perform.
In declarative programming, on the other hand, we tell the machine what we would like to have happen and we let the computer figure out how to do it
Here's an example:
let num = [1,2,3,4];
let tripled = num.map((n) =>  n * 3);

console.log(tripled)  // [ 3, 6, 9, 12 ]
In every iteration, the program triples the num and adds it to an array.
We do not give line-by-line instructions, but it performs the actions all the same. Declarative programming is how React performs so efficiently. It is one of its most powerful features.
By the end of this guide, you should have a good grasp of the fundamentals of React, including:
What is React? Why is it so popular?
How to install React
The key concepts that make React work
What components are
How JSX works
What state is
What props are
How to handle events
What a lifecycle event is
How hooks work
Those topics will be the base for that every advanced concept you will learn in the future. We will cover every topic in the depth of explanation. This book will help Javascript programmers who just shifted to React.
How Much JavaScript Should You Know?
The first question that comes to mind is how much JavaScript you should know before learning React. Before jumping in and starting to learn any framework or library, you should have a good knowledge of the core concepts of JavaScript. It will help you in the long run.

The tech industry is so fast-paced that new languages or frameworks are released frequently. So make yourself fundamentally strong and you're good to go.
You don't have to be a JavaScript guru, but you should understand some basics, like:
After learning these topics, you can begin learning any JavaScript framework or library.
Here are some handy resources for learning JavaScript.
33 concepts you should know about JS GitHub repo
Why Should You Learn React?
There are a number of reasons you may want to learn this popular JavaScript library. Here are a few of them:
React is famous in the Frontend development field because of its UI component's reusability, flexibility, and easy-to-debug nature. These features help developers create large-scale web apps in less time.
You are likely going to encounter a React project in the future or at your current job.
As a JavaScript programmer, you will probably encounter React-based questions in job interviews.
There are lots of frameworks or libraries which are built on top of React. Popular frameworks like NextJs and Gatsby, for example, use React internally.
Learning React makes you a good developer because it promotes good development practices. It makes you think about data flow in your apps as well as managing global state. And its design patterns make you think about different scenarios and edge cases.
If you'd like, you can check out my article where I share more thoughts on Why You Should Learn React.
How is React Different from Other JavaScript Tools?
First, React is really fast because it uses the virtual DOM to render data on the screen. It compares it with previous data, and when any data is updated, only those parts will re-render.
Also, React breaks things down into small chunks of code. Instead of writing a large amount of code at once, you can divide it into smaller reusable parts and use them whenever you want.
React also makes the debugging process easy and makes large-scale development fast.
In addition, React is good for SEO. If the tools you use are not SEO-friendly and fail to help your web apps rank well on Google, it does not make sense to use them from a business perspective.
Finally, React is open source and has a large community to help you out with any problems you might be having. The React community has built many tools and extensions to make it more comfortable and easy to use and debug.
Now that you know a bit more about React and why it's useful, let's set up React in our local development environment.
How to Setup React
To begin, install Node js on your system and verify the current version.
To install the latest React version, you must have Node 14.0.0 or higher installed on your local machine. After this, to create a React app in a fast and straightforward way, you can use the official tool called create-react-app.
To create a new app, run the following command:
When you run the npx create-react-app my-app, it will download the most recent version of React. To start the application run npm start.
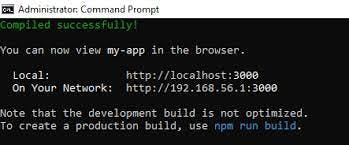
This will be what you see on your command line. By default, this launches the app on your local port 3000.
Now we are ready to start learning the main concepts of React.
Key React Concepts to Know
Components in React
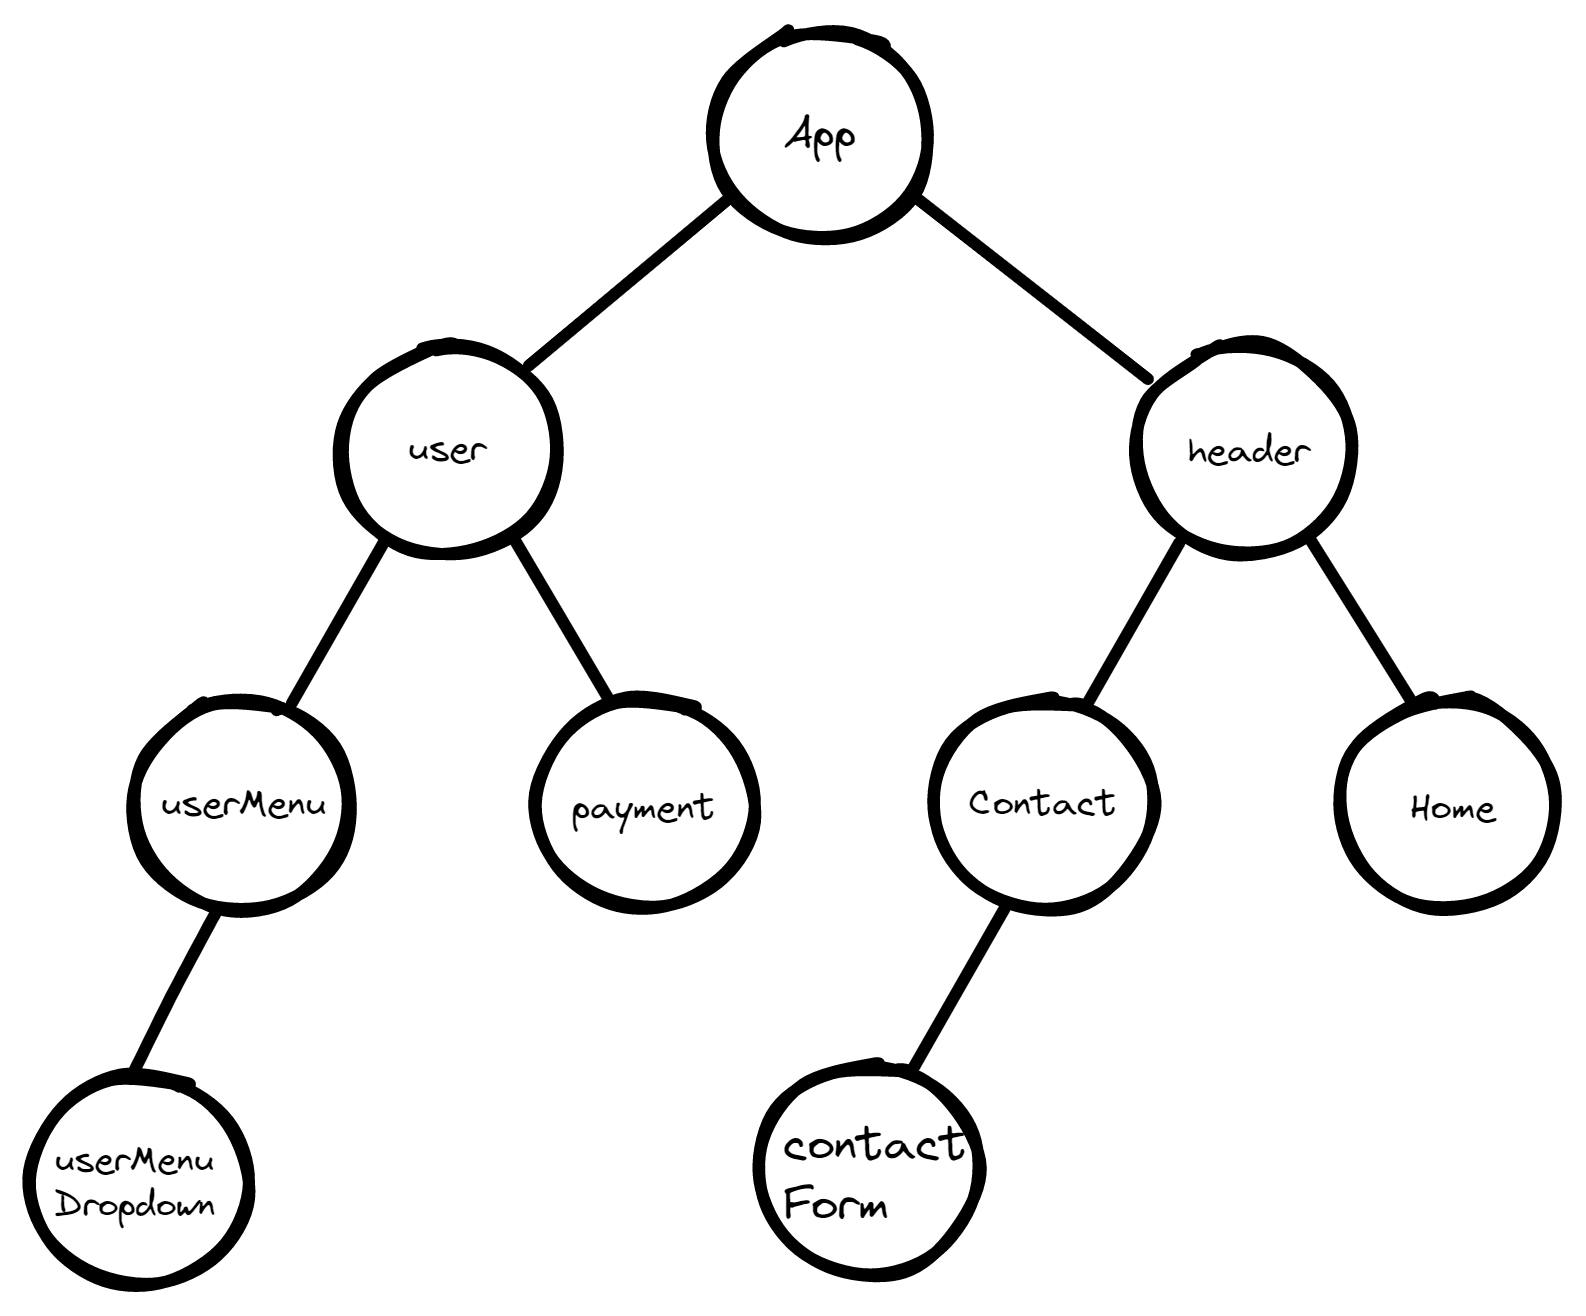
The browser returns a set of React elements, called components, that appear on the computer screen.
React splits the UI into independent and reusable pieces. Each component name must start with a capital letter, which makes it readable. They have their own styles, APIs, logic, and structures.
Functional Components (Stateless)
Functional Components follow the JavaScript ES6 method of writing functions. It only returns the element and they don't have their state. They receive data as props from different components. We will learn in the upcoming section how to manage state.
Let's see an example of a functional component:
//normal function
function HelloWorld(props) {
return Hello, {props.name}
}
//Arrow function
const Hello = (props) => {
return Hello, {props.name}
This is a simple component that gets rendered Hello,{whatever value it gets}.
function App() {
  const [name, addName] = useState('');

  function handleAddName(event) {
    addName(event.target.value);
  }

  return (
    <div>
      <label>
        Name:
        <input type="text" value={name} onChange={handleAddName} />
      </label>
      <p>
        Welcome {name}, I hope you will learn alot in this Handbook.
      </p>
    </div>
  );
}
What is JSX?
Every component you see uses JSX. The best thing about React is that you can easily embed JavaScript into JSX. It gives you the flexibility to build fast UIs. You can import other components from anywhere in the app.
But wait, what is JSX?
JSX stands for JavaScript Syntax Extension, and it lets you use HTML-like syntax in your React components. Let's see how JSX works under the hood.
<Mybutton color="red" shadowsize={5}>
Click here
<Mybutton/>
This code compiles into this:
React.createElement(
Mybutton,
{ color : 'red' shadowsize: 5},
Click here
)
Everything that gets converted in the form of React.createElement() API.
React Without JSX:
You can still use React.createElement() as an alternative to building Components, but it is not a conventional method to use. This is because it creates a lot of unnecessary lines of code which makes your code longer than it needs to be.
import { createElement } from 'react';

function Greeting({ name })  {
    return createElement(
    "h1,"
    {className:'Helloworld'},
    'Hello,'
    createElement('i,' 'null,' 'name'),
    'Welcome!'
    )
}
This is how it gets converted.
In JSX:
function Greeting({ name }) {
  return (
    <h1 className="HelloWorld">
      Hello <i>{name}</i>. Welcome!
    </h1>
  );
}
What's the Difference Between HTML and JSX?
JSX syntax looks like HTML. In HTML, we use class attributes for styling purposes. In Javascript, 'Class' is a reserved word. So we can't use the class keyword. It has a different purpose. For this, React uses className instead of Class as the default for styling.

Here's a simple exercise for you: create a React component that displays the text on the screen "Hello React, World".
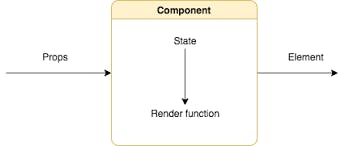
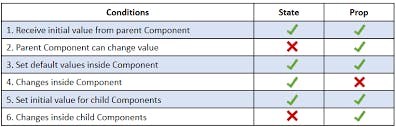
What is React State?
Think about state as a collection of information or objects where you can store your data. Anything outside of the component can't access this data. It's private and controlled by the components.
Every React component has its own state. Whenever a state changes, the component gets re-rendered. This happens when a user clicks a button, responds, or interacts with something on the page. The children components can access these states via props (which we'll discuss below) passed by the parent's component.
This is a basic example of a state with the values of name and age:
function UserInfo() {
  const [name, setName] = useState('');
  const [age, setAge] = useState(0);

  function handleNameChange(event) {
    setName(event.target.value);
  }

  function handleAgeChange(event) {
    setAge(parseInt(event.target.value));
  }

  return (
    <div>
      <label>
        Name:
        <input type="text" value={name} onChange={handleNameChange} />
      </label>
      <label>
        Age:
        <input type="number" value={age} onChange={handleAgeChange} />
      </label>
      <p>
        Your name is {name} and your age is {age}.
      </p>
    </div>
  );
}

export default UserInfo;
Props in React
Props are used to transfer data from a parent to a child component. Props can't be modified, because they're used for read-only purposes. A prop will give the same output for the same input.
Example: GreetingMessage component
function GreetingMessage() {
return <p>Welcome!</p>

//we used it like this
This component doesn't have an initial value – in other words, it does not have props. We call props the initial value passed to the component. If we did not pass any value to props, then a default value of 'True' will be assigned.
JSX attributes are passed in components as a single object:
<GreetingMessage myprops = {'some value'} />
It receives as an argument inside the component.
function GreetingMessage(props) {
      return <p> Welcome! </p>
  }
You can use object destructuring to use props by name.
function GreetingMessage({myprop}) {
      return <p> Welcome!, {myprops}</p>
  }
You can also pass a function as props.
function passedFunc() {
    return <p>passed as function</p>
 }

<GreetingMessage  passedFunc = {passedFunc} />
State vs Props
Exercise 2:- Create a toggle component using React state and props that displays two buttons and toggle between two states when the button is clicked.
4). Keys
Lists are handled similarly to Javascript. It helps to identify which Items are changed, added, or removed. When we iterate over an array, we have to give a key to elements for secure identity.
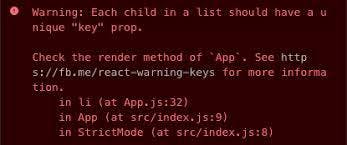
This warning every React developer has seen in their life
Let's learn how React-Key works under the hood.
A simple example of a list :
<ul>
    <li>React</li>
    <li>JavaScript</li>
</ul>
So we want to add an element to the list.
<ul>
    <li>React</li>
    <li>JavaScript</li>
    <li>Java</li>  //newly added element in the list
</ul>
The two lists have an identical element, it is for React to compare and add an element at the end of the iteration.
What will happen when we add the new item to the top of the list?
<ul>
    <li>Java</li>  //newly added element in the list
    <li>React</li>
    <li>JavaScript</li>
</ul>
When we do this, React gets inefficient because it mutates everything and iterates the whole list again. It works for small types of lists, but when it goes to production. It will create lots of mess and bugs.
Here is an example:
const count = 1;
const words = ["React," "JavaScript," "Framework," "library"];
const Upper = words.map( (item) => {
      return <li key ={count++}>{item.toUpperCase()}<li/>
)
}
To avoid this, you have to use nanoid. It creates unique IDs to prevent a negative effect on performance.
import { nanoid } from 'nanoid';

const words = ["React," "JavaScript," "Framework," "library"];
const Upper = words.map( (item) => {
      return <li key ={nanoid()}>{item.toUpperCase()}<li/>
)
}
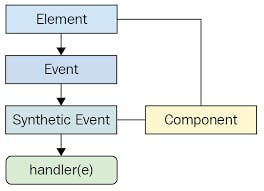
5). React Event Handlers
When we click some button or interact with UI, we get a response from the other side. It is happening through Event handlers. It determines which action is performed when the user interacts with it. when some event is performed.
If you know how to handle events in javascript, for React it becomes easy for you to handle an event. there is some exception we need to take care of.
In React Event Handlers are written in CamelCase form like this onClick, on mouse up, and onChange*,*
Here's an example:
//In Html

<button onclick = "clicked()">
You clicked a button
</button>

//in React

<button onClick = {clicked}>
You clicked a button
</button>
In React, we have to call explicitly to the preventDefault method to avoid the default behavior of the app. In HTML, it is partially true.
//in HTML
<a href="www.google.com" onclick="console.log("Clicked")" return false>
Click the link
 </a>

//In React
Function EventHandle(){

function handleClick(e){
  e.preventDefault();
 }

return (
<a href="www.google.com" onClick ={handleClick}>
Click the link
</a>
)

}
We can write Event handlers as an Inline Function.
We can directly write within the JSX. We have to pass the inline function to the event handlers. You can use this If there is no complicated logic or make a separate Handling event function.
Now let us understand:
const Hello = () => {
    return (
        <div>
          <button onClick ={ () => console.log('Hello Clicked')}>Hello World<button/>
        </div>
    )
}
We can also use synthetic events(e) to get the values of the target element.
const Hello = () => {
    return (
        <div>
          <button value={'Welcome to the World'}
          onClick ={ (e) => e.target.value}>Hello World
        </button>
        </div>
    )
}
Exercise 3:- Create a simple list component using react keys and event handlers that display a list of items and allow a user to remove them by clicking a button next to each item.
6). Hooks
The most prominent feature of React and It's introduced in V16.8.
In the Class component,
We have to take care of Autobinding and "This"
The codes get lengthier, and serval lifecycle methods are hard to follow.
It is hard to share logic and reuse the component
To solve all of these class-related problems. Hooks came into the picture. It is cleaner, more readable, and maintainable. So let's learn some Hooks and how it used.
Hooks make us use state and other class function features without writing class syntax. It also provides Lifecycle methods
useStates creates a state variable. So we initially set the count to 0. useState preserves the initial value(it can be null too) to later use after calling the Hook.
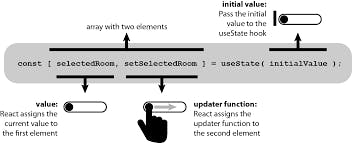
useState returns a pair of values first one is the current state and the second is the function that updates it.
That is the reason we write const [value, setValue] = useState("initial Value")
function Counter = () => {
    const [count, setCount] = useState(0);

    function handleClick(){
        setCount(count + 1);
    }

    return (
        <div>
            <h1>Count: {count}</h1>
            <button onClick={handleClick}>Increment</button>
        </div>
    )
}
export default Counter;
We initialize a state and set it to "0." Now React will remember its current value and pass the most recent one to our (setCount)function. If we need to change the value of the current state, we have to call setCount.
Exercise 4:- Create a decrement counter
function Counter = () => {
    const [count, setCount] = useState(0);

    function handleClickInc(){
        setCount(count + 1);
    }
    // add your logic here
    function handleClickDec(){

    }

    return (
        <div>
            <h1>Count: {count}</h1>
            <button onClick={handleClickInc}>Increment</button>
        </div>
    )
}

export default Counter;
8). React Fragments
It is useful when we want to return multiple children to DOM. It makes a group of children without using an extra Node(Div element). Using extra div affects React performance. It also matters in businesses where it cost lots of money.
Example:
//in above example we have written extra div

function Book = () => {
  const [name, setBook] = useState("Chemistry")

return (
    <div>
      <p>You are reading, {name}</p>
      <button onClick = { () => setBook("Physics")}>
        changed the book name</button>
     </div>
  )
}
// Here we can use React Fragment to avoid
// unnecessarily Node to add pressure on DOM

 function Book = () => {
  const [name, setBook] = useState("Chemistry")

return (
    <>
      <p>You are reading, {name}</p>
      <button onClick = { () => setBook("Physics")}>changed the book name</button>
     </>
  )
}
<> </> This is a shorthand syntax for React.Fragment
React VDOM
React uses VDOM(Virtual Document Model) to display the UI on the screen. In React, The virtual DOM differs from the actual browser DOM(BDOM). But why does React choose VDOM over BDOM
Let's explore VDOM and BDOM in depth.
What is VDOM?
The virtual Document object model(VDOM) Copies the whole structure from Browser DOM.

In Virtual DOM, React does not update the whole DOM whenever some data is changed. First, it compares with copied DOM to Browser DOM. If it finds that there are any changes, VDOM update only that part of DOM or Node(Obj or Div) instead of updating the whole DOM as Browser DOM.
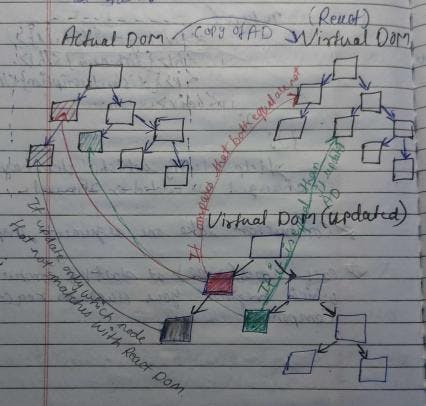
This makes the web run faster and gives a high-level performance

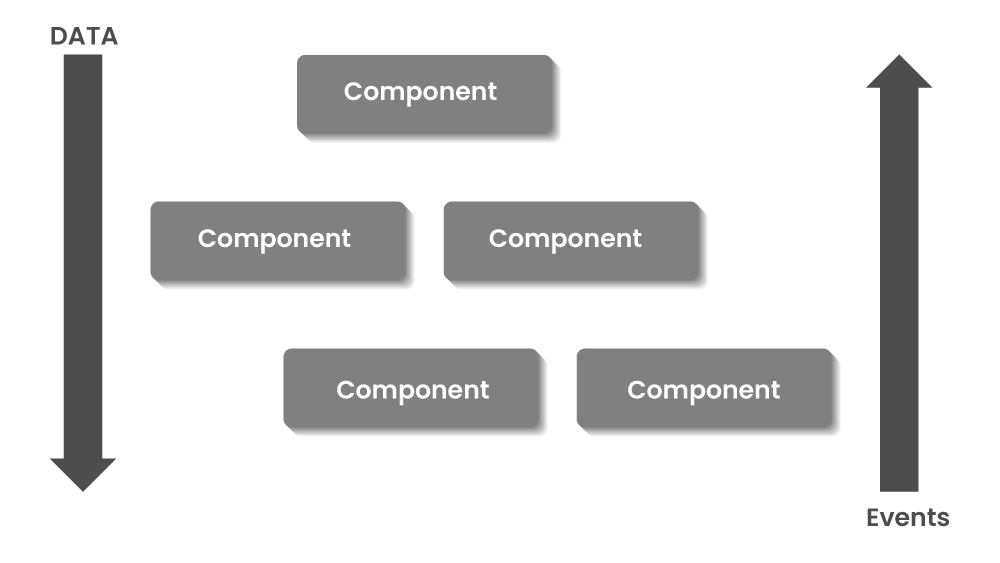
Data Flow In React
React only supports data that flows from an upward to downward direction because it follows a single source of truth for any data change in React.
What does a Single Source of Truth mean?
It says that every component which uses data should have a global state. let's understand with an example.
Suppose we have created three components App, ButtonCliked, and Form
let us think the user clicks the button and fills out the form. The data stays only in that component. So when we want to access that data from the child component to the parent component, we have to lift the data, lifting the state where we have common data which can be passed all over the application.
If we need to pass data from child to parents we need to use state management tools or methods like Context-API, Redux, and Zustand.
That's all I have to say in this blog post.
If you want to learn how to organize a react project according to industry standards. Here is where I've shared my experience.
7 Best Practices for Keeping a React Project Clean and Efficient.
So far, we have learned a great deal.
Do not be afraid to ask your questions and make corrections and suggestions in the comments. I'm expecting them.
Furthermore, if you found this blog post useful, please share it with your friends and colleagues who might benefit from it as well. Your support enables me to continue producing useful content for the tech community.
Now it's time to take the next step by subscribing to my newsletter and following me on Twitter.
Want to read more interesting blog posts written by me
✅ Here are some of my most popular posts that you might be interested in.


